Company Settings
Before using the software you will want to get everything set up for your needs. Click on Setup in the top menu to see a list of setup choices.

Click the links below to jump to a specific step.
Step 2 - Setup Locations & Categories
Step 1 - Configure Settings
First, click on Settings.from the drop down menu. Here you can add your company information.
 Click the Program Settings tab to set a starting Work Order, Purchase Order, or Invoice number. Each of these numbers will automatically increment by 1 for new records.
 Click on the Backups tab to save a backup schedule. Click here for more information on backing up the software.

Step 2 - Setup Locations & Categories
Maintenance Pro allows you to organize your equipment in the form of a tree, consisting of Locations and Categories.
Go to Setup in the top menu and click Locations to manage the Location and Category list. Here you can add, edit, and delete locations and categories. Note that items in this list cannot be deleted if equipment still resides in the location/category you are trying to remove.

Top-level locations can have their tax rates modified via the Edit button (pencil icon on the right side).

Once these are defined, you may use the structure to organize Equipment, Employees, Work Orders, Purchase Orders, and Vendors. This provides you the ability to filter these items by Location on various screens and within your reports. In addition, most built-in reports are grouped by Location and Category by default.

Step 3 - Inventory Warehouses
Click on Setup at the top and choose Warehouses.
Maintenance Pro allows you to organize your Parts Inventory into multiple warehouse facilities. Warehouses are intended to be different physical locations where part stock is kept.


From the Warehouses management screen you can click New to add a new warehouses to the system. You can also click the Edit button (pencil icon) to change the name of a warehouse, or the Delete icon (red X) to remove a warehouse from the system.
Click the Email Notifications tab to add any contacts that should be emailed when parts need to be re-ordered.

Step 4 - User Preferences
Click Setup at the top and choose User Preferences.
The User Preferences screen allows you to setup program defaults, such as common reports, user interface colors, default date range filters, and more.

There are a number of settings to choose from in User Preferences. We will go over the most common settings below.
General Options
On the initial User Preference screen that appears, you can set a default location / category to pull up whenever the program is open.
 Underneath this you can setup the Common Report list that appears when clicking Reports on the top menu.

In the Notifications tab you can setup background and font colors for the equipment list.
 In the example above the Due Colors option was checked and a background color selected. On the equipment list we can see this background color on the rows for due equipment.

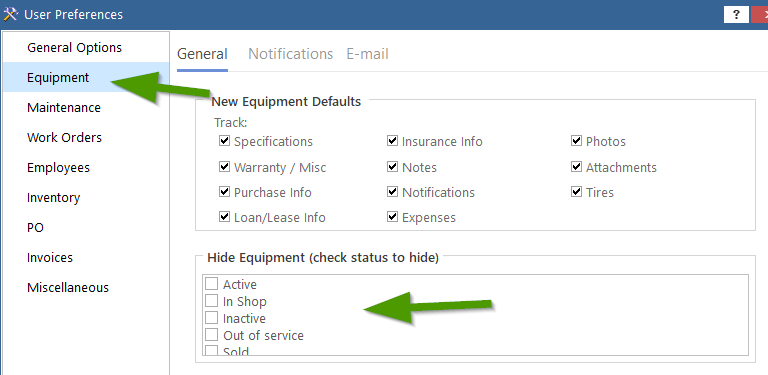
Equipment
Clicking Equipment on the left (within the User Preferences window) gives the option to Hide Equipment. If you do not wish to see Inactive equipment in the equipment list at all, you can check Inactive here to hide assets with that status.
Work Orders

Click Work Orders on the left to view Work Order preferences.

1) Setup a WO prefix that goes in front of the WO number (MAINT- for example). A default status can also be selected.
2) Tell the system whether or not labor should be included in any tax calculations.
3) When pulling up a list of Work Orders, you can tell the system how far back you'd like to go. Note that in the Work Order list you can always choose a date range. This setting specifies a default date range.
Inventory
Click Inventory on the left.

Here you can setup a default warehouse to use for parts. You can also turn on overdraft for parts. If 'Allow overdraft' is checked, then part quantities can go below 0 into the negative. If this is left unchecked, then if a part has a 0 quantity it cannot be used for maintenance.
Miscellaneous
Here you can set a default date range to use when viewing equipment maintenance history records.
